Friday, January 29, 2010

Sam's Lunch Box

First day of school always makes me nervous...I'm kind of person that is worry too much. Worry that my son misses me ( I think the other way round...I actually miss him :-( ) but my biggest worry is that my son won't eat his lunch. Sam loves burger especially cheese burger so for his first day at school Imade him cheese burger. I made the burger bun from the potato bun recipe and sprinkle some sesame on top. for the burger, I used pork mince, onion & garlic mince, some oyster sauce, little bit of salt, wocestershire sauce and some bread crumb. And of course, slice of cheese and fresh cucumber and some mayonaise...sam loves it and when he got home he asked for more.

For his morning tea, I packed him some fruits skewer and cheese sticks. I got the cheese stick idea from my friend Betty. It is easy to make and make a good healthy snack. I used 1 sheet of puff pastry then brush with egg then fold in half. Brush both side of the pastry with egg and sprinkle with shredded cheddar cheese. With pizza cutter or knife cut the pastry into 10 long strips. Twist the pastry and oven until puff and brown @190C.

First of school...I got happy boy and happy tummy...:-)


Friday, January 22, 2010

Apricot Puffs

Have a sudden craving for dessert or need a quick dessert for lazy Saturday afternoon? Try this recipe and I promise you gonna love it. This apricot puffs are very easy to make and taste fantastic.


Apricot Puffs
3 sheets ready-rolled puff pastry
825 gram can halves apricot in natural juice
125 gram cream cheese
3 teaspoon caster sugar
1 egg white, lightly beaten
1 tablespoon apricot jam
icing sugar to dust (optional)

1. Preheat the oven to hot 220C (425F/Gas 7). Cut one pastry sheet into 9 squares. Drain the apricot.

2. Place the cream cheese and sugar in a bowl and mix well. Divide the mixture into 27 and spread evenly over each of the pastry squares, leaving a 1 cm border all around.

Place one apricot half, cut-side-down, in the centre of each pastry square and brush the edges of the pastry with a little water.

Bring the corners together in the centre to form a pyramid and seal the bottom half of the edges by pinching them together.

Fold back the top of the pastry corners to reveal the filling.

3. Brush the pastry with egg white, sprinkle with sugar and bake for 10 minutess, or until puffed and golden brown. Glaze with warmed apricot jam and lightly dust the edges with icing sugar. Serve warm.

John's Birthday Cake

This was a birthday cake for John, my brother in law. Blue berry was in season...I love blue berry the rich berry flavour and high in antioxidant and it always looks good on a cake. I thought cream cheese would go well with blue berry so I chose carrot cake as the base.

Firstly, I baked the cake as per recipe then let it cool completely. Then I started to ice the cake with cream cheese.

For the side, I melted some dark chocolate and pour it on a baking paper. let it dry for couple of hours in the fridge. Once the chocolate dried, I cut it into the size that I wanted. The chocolate height has to be higher than the cake so the blue berry won't roll out easily.Later, stick the chocolate pieces onto the side of already iced cake.

Next, the fondant decoration. I prepared the figurine one week before hand. Starting with the sofa and the cushions then the human figure and the lamp. I added the balloons on the actual decoration day as I thought the cake was lack of colour. I borrowed the balloon idea from movie 'UP'...my kids and I really love this movie and the balloons were so beautiful and full of imagination. Finally, wrapped plastic strip around the cake and securely tied the ribbon.

The sofa, cushions and lamp were made based on the actual items.

Wednesday, January 20, 2010

Sausage bun

Time to fill up tummy...another bun for supper. I used the basic recipe from Ham & Cheese bun and I added sausage for filling.

Sausage Bun

500 gram flour

2 1/4 (7.5gram) yeast

50 gram sugar

1 egg

300 gram ice water (cold milk)

1 tsp salt

30 gram olive oil

some chopped spring onion

36 cocktail sausages

evaporated milk for brushing or coating

Spread

5-6 tbsp mayonaise

2 tbsp sweeten condensed milk

1. Mixed well flour, yeast and sugar.

2. With mixer add egg & ice water and mixed until smooth.

3. Add salt and olive oil. Mixed and knead until smooth and elastic. Knead spring onion until they well spread. stand for 30 minutes.

4. Flatten the dough with rolling pin. Divide the dough into 36 small balls. flatten individual ball, spread mayonaise and put 1 sausage in the middle then fold and wrapped tight. Stand for 60 minutes or until increase in size.

5. Brush with evaporated milk.

6. Oven @ 190C for 12 minutes or until golden brown.


Christmas Cupcakes


Finished preparing the decorations, now the final job. I used dark chocolate mudcake, ganached with dark chocolate and covered with fondant.


Santa Clause

Christmas Boy & Girl

Christmas Penguin

Christmas Snowman & Teddy

All cupcakes were individually wrapped in pink and purple paper and tied with golden ribbon.

Because I couldn't find box that I like so I made them and tied red & gold ribbon for final touch.

Christmas Decorations

These are fondant figurines that I made for my christmas cake decorations. It was really neck breaking exercise so I did them in batches...it took me few days to finished them as I couldn't do them in one go.

Christmas carol

Penguins Parade


Merry Christmas Teddy

Christmas Snowman

Tuesday, January 19, 2010

Black Glutinous Chiffon Cake

My best friend Ikna gave me a very yummy chiffon cake during my visit to Jakarta 2 years ago and my husband loves it. And thank you for Ikna generosity to share her recipe with me. Chiffon cake is not an easy cake to make, any wrong step will make your cake to fail. You have to beat the egg whites until very stiff and the oven temperature has to be perfect.


Black Glutinous Chiffon Cake
A :
160 gram egg yolks
75 gram caster sugar
1 tsp vanilla
B :
240 gram egg whites
125 gram castor sugar
1 tsp salt
C :
50 gram flour
100 gram black glutinous powder
1 tsp baking powder
D :
150 ml instant coconut milk
3 tbsp vegetable oil
1. Preheat oven @ 200C
2. Beat A until thick and set aside. With a clean mixer beat B to stiff consistency.
3. Add and mix well B to A slowly and in few stages.
4. Sieve C to A&B mixture and carefully mix the ingredients (becareful not to flatten the egg white mixture).
Slowly add D into the mixture and mix well.
5. Pour the mixture into a chiffon pan and oven for 20 minutes @200C then reduce the temperature to 150C and continue baking for 30 minutes.
6. Turn off the oven and put the pan upside down until the cake cool.

Happy Bugs

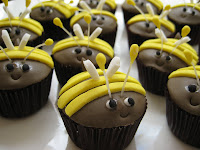
Time flies, I didn't realize it was end of the year already and my son graduated from his kindergarten. So I planned to make cakes that would put smile on the kids' faces. Here it is, another creative idea from PC. I made around 35 mini dark chocolote mud cupcakes and ganached them with dark chocolate.


Kids just love them and I had lots of fun making them. Do you smile when you look at them?


Fondant cake

Addicted to fondant decoration, I tried to decorate a bigger cake. It wasn't as easy as I thought. With bigger cake, everything has to be as neat as possible otherwise it'll look un-professional. The cake itself has to be flat and even to get the sharp corner just like Planet Cake's cakes.
Firstly, prepare and bake any cake of your choice. cut any crust and even up the top of the cake. Then ganache the cake. For ganache, you can use dark or white chocolate ganache or buttercream. Ganache works as edible putty to cover any imperfection of the cake.
Secondly, roll out the fondant to 3 mm thickness and start covering the cake. Cut out any excess fondant then smooth the surface with acrylic smoother.


Finish covering the cake, you can start to decorate the cake with any decoration that you want. I use some pink roses that I made couple of days before.
For the detail description on cake decoration, please refer to Planet Cake book or any other book that you prefer.

Fun Cupcakes

I always love home made stuff and foods...there are lots of love in preparing and making the foods. My grandpa is my great influence, my grandpa was a baker for his whole life. He dedicated his life making beautiful pastries for his family and people around him. When I was young, I always stayed with my grandparents during the school holiday. My grandpa worked from morning till night and he always brought back lots of bread and cakes with him. Those breads and cakes were the best that I ever tasted. Grandpa told me that "you can show your love through the foods that you make and people will feel it". Grandpa is my superhero.


This was the first time I used fondant to decorate my cupcakes. Thanks to Ikna (my very best friend), she showed me that fondant decoration is a very fun and I really love it.
I remember seeing my kids faces when they saw the cakes...those twinkling eyes and big smiles...hard works really pay off.

Monday, January 18, 2010

Potato Bread

It was last year when I tried on potato bread for the very first time and I really love it. The bread was so soft even until the very next day. You can just eat it without any topping or serve it with some spreads like strawberry jam, marmalade and nutella. Perfect bread for breakfast, lunch and tea. Unfortunately, I can't find this bread in Melbourne's supermarket so I tried to make one with the recipe that I have.

Potato Bread

400 gram flour
200 gram steam & mash potato
2 tsp (6gr) yeast
75 gram sugar
2 egg yolks
150 ml evaporated milk
75 gram margarine
1 tsp salt
2 tbsp evaporated milk for brushing/coating


1. Preheat oven @ 190C.
2. Mix well flour, potato, yeast and sugar.
3. Slowly add egg yolks and evaporated milk. Mix until smooth.
4. Add margarine and salt. Knead until elastic. Stand for 30 minutes. Flatten the dough with rolling pin.
5. Divide the dough into 25 gram ball.
6. Place the dough ball next to each other on the prepared baking tray (laid with baking paper). Stand for 90 minutes or until increase in size.
7. Brush with evaporated milk.
8. Put in oven for 15 minutes or until golden brown.


Assorted Cupcakes

Another collection of mini cupcakes projects.


For these cupcakes, I used Victorian sponge recipe from Peggy Porchen book. It came out perfect but the cakes taste a bit dry. For the frosting, I used dark and white chocolate ganache.


Lemon sponge with buttercream frosting and fondant decorations. I was trying different piping tips and different swirl. I still need lots of practice in piping especially the roses swirl.

Ham & Cheese bun

I really like savoury bread especially in winter...imagine in cold days with a cup of hot choc or hot soup and a rich cheesy bun...yummmm


Here is a modified Ham & Cheese bun recipe that originally Cheese & Oregano bun.

Ham & Cheese Bun

500 gram flour

2 1/4 (7.5gram) yeast

50 gram sugar

1/4 tsp tumeric

1 egg

300 gram ice water (I used cold milk instead)

1 tsp salt

30 gram olive oil

2 tsp oregano (I used spring onion, onion & shredded ham)

evaporated milk for brushing or coating

For sprinkle/topping (mixed well)

100 gram mozzarella cheese

50 gram cheddar cheese, grated

1. Mixed well flour, yeast, sugar and tumeric.

2. With mixer add egg & ice water and mixed until smooth.

3. Add salt, olive oil and oregano (if use). Mixed and knead until smooth and elastic (if the dough gets to hot, continue the kneading by hand). If use, add spring onion, onion and ham knead until they well spread. Stand for 30 minutes.

4. Flatten the dough with rolling pin. Divide the dough into 50 gram small balls. Stand for 60 minutes or until increase in size.

5. Brush with evaporated milk. Then sprinkle with cheese.

6. Oven @190C for 12 minutes or until golden brown.

Sunday, January 17, 2010

Choc chips & Sultana buns

Picnic time for the family...my husband suggested we packed something light and still tastes good when it cold. So it means no fried rice or fried noodle...how about bun. My mum bought me a really good recipe book for Roti (means bread or bun in Indonesian). It has any kind of bread from simple bread to complicated bun. My kids were really excited about the picnic and they promised to finished all the food that we'll pack. I tried this simple bun recipe. This is a basic bun recipe with no topping so I added a little modification. I added some sultana and chocolate chips. It turned out really good...my husband said just like the buns from 'Bread Top'...hahaha...he's such a good supporter.


Basic Bun

500 grm flour

2 1/4 tsp (7.5gr) yeast

75 gram sugar

15 gram milk powder

1 egg

265 ml ice water

1 tsp salt

50 gram margarine

any topping that you like (sultana, choc chips etc)

evaporated milk for brushing

1. Evenly mix flour, yeast, sugar and milk powder.

2. With mixer slowly add egg and ice water until smooth.

3. Add salt and margarine. Knead until smooth and elastic. Stand for 30 minutes.

4. With rolling pin flatten the dough. Divide the dough into 30 gram small balls. Stand for 10 minutes.

5. Once again flatten the dough. Add any topping that you like and make into small balls. Stand for another 75 to 90 minutes or until increase in size.

6. Brush with evaporated milk.

7. Put in 190 degree Celcius oven for 10 minutes.

This recipe is quite easy but the hardest part is the kneading. Always remember to continue kneading with hands once the dough gets warm or hot on the mixer. Keep kneading until the dough gets really smooth and elastic and not sticking onto your hand. Happy trying.

Chocolate Cupcakes

Trying on another recipe for chocolate cupcakes. I used the recipe from Women's Weekly Cupcakes & Cookies recipe book. The recipes from this book are really fabulous especially for beginner. you usually get it perfect even on the first attempt. A simple and good recipe is the most important for a succesful cake.

The original recipe is a 'Chocolate and coconut sponge cakes' but I didn't use any coconut. I topped the cupcake with buttercream and decorated with fondant flower. I think chocolate always goes well with buttercream.

Saturday, January 16, 2010

Mini Carrot Cupcakes

I don't really like sweet foods but my boys (my son & my hubby) and my daughter love them. As a cook in the family, I always try to satisfy their craving for sweets. So mini cupcakes always come in handy. The size of the mini cupcakes are just perfect for the kids...I use them for family gathering, kids birthday party and even a picnic. I made about 50s mini cupcakes from 1 carrot cake recipe. It was easy and yummy...you don't even need a knife to cut them into slices and they look good.


This was the first time I actually decorated my cupcakes. Usually they just gone before I had time to look at them... :-)


I used cream cheese and fondant flower for decorations.

Carrot Cake
5 eggs
2 cups caster sugar
1 tsp cinnamon
1 tsp baking soda
1 tsp baking powder
1/2 tsp salt
1 cup oil
3-5 cups shredded carrot
1/2 cup almond
raisins (1 small box 1.5 oz) optional
2 cups flour

Cream cheese frosting
mix together, until smooth
1 tbsp (20gr) butter
4 oz cream cheese
1 tbsp vanilla
1/8 tsp salt
1 cup icing sugar
1. Pre-heat oven to 180 degree C. Grease 13 x 9 inch cake pan, dust with flour.
2. In a large bowl, with an electric mixer, beat eggs & sugar until light and fluffy.
3. Sift together the flour, cinnamon, baking soda, baking powder & salt.
4. Fold in the flour mixture until just combined.
5. Fold in the carrots, oil, almonds & raisins until combined.
6. Pour batter into prepared pan & bake until a toothpick inserted in the centre comes out clean about 45 minutes.

With this recipe I made 52 mini cupcakes and the baking time is approximately 10-15 minutes per tray.

This recipe was a courtesy from my best friend and I use it for many of my cakes. It tastes really good and very moisture. worth trying as it tastes yummy and full of nutrients.